Zoom Meeting Best Practices

WashU’s response to COVID-19, which includes a shift to telework to minimize physical presence on campus, has also had an effect on faculty and staff meetings, classes, exams, thesis and dissertation defenses. We recommend conducting your remote meetings via Zoom, which is the university-sponsored web-conferencing solution; However, security issues such as unwanted participants and Zoombombing remain possibilities. While Zoombombing is something that the Office of Information Security and WashU IT continues to take precautions to prevent, there are precautions you can take as well. The guides below provide best practices for how to conduct your Zoom meetings securely.
Users can follow these security tips to ensure meetings continue to run smoothly and sensitive information is not shared with outside parties.
Preparing for the Meeting:
Meeting Passwords set to “on” by default: This ensures that only those invited can attend. Going forward, your previously scheduled meetings (including those scheduled via your Personal Meeting ID) will have passwords enabled. If your attendees are joining via a meeting link, there will be no change in their joining experience. For attendees who join meetings by manually entering a Meeting ID, they will need to enter a password to access the meeting. This password can be found within the meeting invitation.
Sharing a Meeting: There are several guidelines users can follow to ensure Zoom security in regards to sharing meetings.
- Keep links to Zoom meetings private and only share meeting links through direct messages to the meeting’s intended participants. Meeting Links allow ANYONE who has access to the link to join the meeting.
- DO NOT use your Zoom Personal ID (PMI) for public events, classes, or scheduled meetings. Your Personal Meeting Room is ideal for use with people you meet with regularly. However, because it is always accessible with the same Meeting ID and personal link, it should not be used for back-to-back meetings or for meetings involving people with whom you do not meet regularly. Once a participant has the link to your PMI, they can join it at any time the meeting is in use, unless you lock the meeting or use the Waiting Room feature to admit participants individually.
- DO NOT share Zoom meeting links on ANY public website
- DO NOT share Zoom meeting information on social media. Social Media includes, but is not limited to, YouTube, Twitter, Instagram, and Facebook.
Using the Waiting Room default. Waiting rooms are now the default setting, meaning participants will no longer be able to enter meetings before the host.
To admit participants as a host:
- Join the meeting
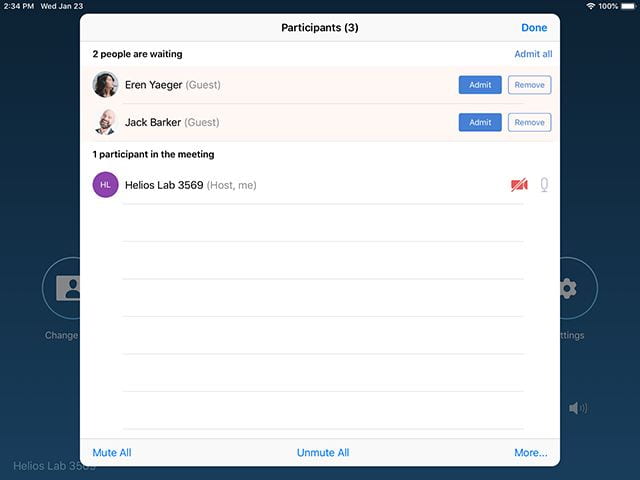
- Click the “Manage Participants” icon. “Manage Participants” will allow you to view the full list of participants in your waiting room.

- Either admit individually by selecting the blue “Admit” button or submit all participants at once with the “Admit All” option on the top right-hand side of your screen.
Be prepared in case of a Zoomboming incident.
- Know how to end the meeting or remove the intruder from the meeting.
- Click on Manage Participants in the meeting controls at the bottom of the Zoom window.

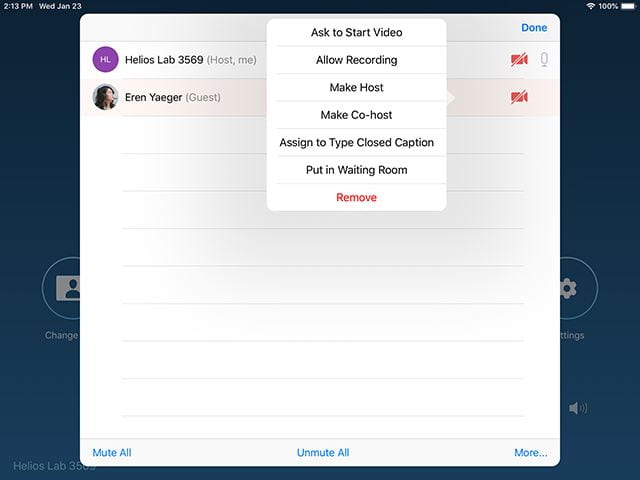
- Hover over the name of the participant who you want to remove and choose More.
- Click remove

- Click on Manage Participants in the meeting controls at the bottom of the Zoom window.
- Have a plan for communicating with participants who were in attendance (e.g. post an announcement on your Canvas page if this is a class), and consider how to continue or reschedule the meeting. It may be helpful, for example, to share the remainder of your slide deck or simply move an agenda item to a later meeting occurrence.
- Ensure that future meetings are not susceptible to Zoombomb intrusions (update meeting settings in accordance with best practice recommendations) and let your participants know that you have addressed the vulnerability.
- Inform the WashU Information Security Office (infosec@wustl.edu) about any Zoombombing incident you experience. They can investigate and take appropriate follow-up measures on an institutional level.
During Your Meeting:
Lock the meeting once all participants have joined. This feature allows the Host and Co-Host to prevent additional users from joining even if they have a meeting ID and password. When you are in the meeting, click Participants at the bottom of your Zoom window. In the participants’ pop-up box, you will see a button that says Lock Meeting. You can learn more about locking meetings and managing participants in a meeting.
Screen Sharing defaults to ‘Host-Only’ – DO NOT change to ‘Participants’ if someone besides the host needs to screen share; they can be elevated to co-host. Elevating individual participants to ‘co-host’ (instead of enabling screen sharing for all ‘Participants’) prevents other participants from sharing unwanted/irrelevant content. To make a participant a co-host during a meeting:
- Click on Manage Participants in the meeting controls at the bottom of the Zoom window.

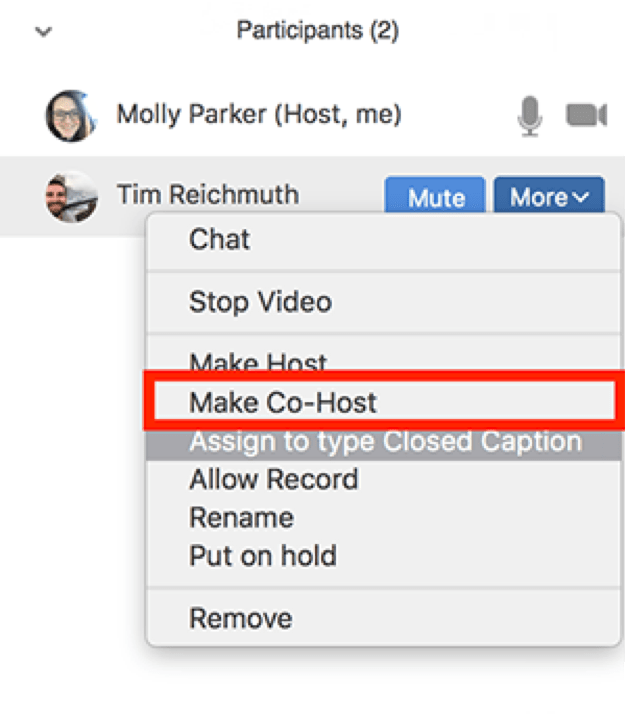
- Hover over the name of the participant who is going to be a co-host, and choose More.
- Click Make Co-Host.

Remove Participants that do not belong in the meeting or are disruptive during the meeting.
- Click on Manage Participants in the meeting controls at the bottom of the Zoom window.

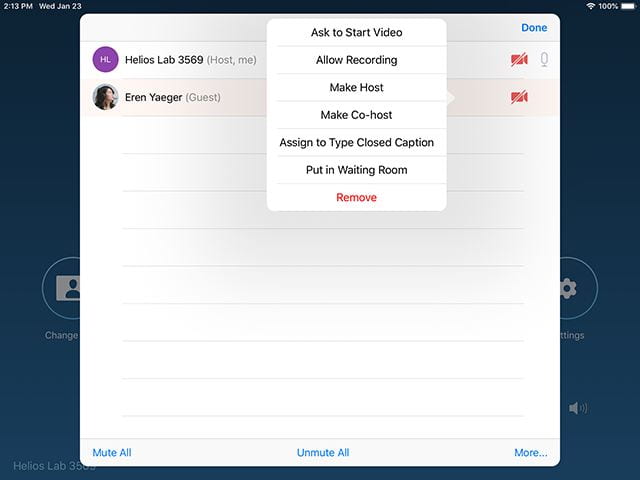
- Hover over the name of the participant who you want to remove and choose More.
- Click remove

To ensure all meeting recordings remain secure, please be advised of the following:
- Zoom meetings are only recorded at the host’s choice and are either saved locally on the host’s machine or in the Zoom cloud – both of which are safe and secure ways to store recordings.
- Security issues arise when hosts choose to upload their meeting recording(s) anywhere else (ex: YouTube, Vimeo, an open cloud, etc.).
- Users are advised the best-practice is to avoid copying your recording to public locations if you wish to keep it secure.
- Users within the WUSTL HIPAA group can not save recorded meetings to the Zoom cloud.
Users can learn more about recording on Zoom’s recording support pages.
Webinars allow for hosts to set-up meetings in which attendees are muted and can’t unmute themselves. Additionally, those seeking to host meetings with more than 300 attendees, may purchase a Zoom webinar license through the software licensing catalog. Please note purchasing a webinar license is only accessible with a WashU IP address; attempts to access off-campus without a VPN will result in a 404 error. Zoom Webinar License Details:
- Webinar 500 (up to 500 attendees): $1,215/year
- Webinar 1000: $2,924/year
- Comparison between meetings and webinars
- Purchase a Zoom Webinar License
- Contact software licensing: softwarelicensing@wustl.edu
- Those not needing ongoing webinar capabilities can work directly with Media Services by submitting the Zoom Video Communications form in ServiceNow.
As of Friday, April 10, 2020, all University managed Windows computers’ Zoom installations were enabled for auto-upgrading. The next time users open their Zoom app, they will be prompted to upgrade and should accept the change. Note that your computer must be restarted for this setting to take effect. This upgrade will ensure that any security changes to the Zoom app will be applied directly and quickly from Zoom.
Significant changes and enhancements from this upgrade include:
- Remove the meeting ID from the title bar. The meeting ID will no longer be displayed in the title bar of the Zoom meeting window. The meeting ID can be found by clicking on the info icon at the top left of the client window or by clicking Participants, then Invite.
- Invite button under Participants. The button to invite others to join your Zoom meeting is now available at the bottom of the Participants panel.
- Local file transfer in meeting chat. The feature file transfer in meeting chat has been re-enabled. Third-party file transfers and sharing clickable links are still disabled.
- Security icon in host’s meeting controls. The meeting host will now have a Security icon in their meeting controls, which combines all of Zoom’s existing in-meeting security controls into one place. These security controls include locking the meeting, enabling the ‘Waiting Room,’ and more. Users can also now enable Waiting Room in a meeting, even if the feature was turned off before the start of the meeting.