Emma for Mass Emailing
For New Users | Resources for Current Users | Compliance & Best Practices | FAQ

Emma a is a web-based email marketing tool for creating and delivering bulk or mass email communications. There is no cost to WashU faculty, staff, or students to use this resource. Users can log in to Emma from anywhere with an internet connection using their WashU Key.
Emma empowers you with the ability to:
- Organize your audience to send targeted and customized content to them.
- Build your message using a drag and drop editor.
- View email analytics, such as clicked links and open rates.
- Automatically send targeted emails to your audience based on actions that they’re taking.
- View your audience engagement, performance trends, engagement times and growth overview.
For New Users
Accessing Emma
Who can request access: Any WashU employee can request access to WashU’s Emma account.
How to request access: All Emma users MUST be assigned to a subaccount.
- If you know the subaccount you need to be added to, complete the Emma Access Request form and identify that subaccount.*
- If your team/department is not yet using Emma and you need to create a subaccount, complete the Emma Sub-account request form and complete the Emma Access Request form for each user.*
If you still have questions, you can request more information or a consultation.
*Emma Access Requests: Before requesting new user access to Emma, you will need to complete the Emma Acceptable Use Agreement in Workday. Then, come back here to access the request form (in step 3 below) and upload your Workday Emma Acceptable Use Agreement Learning Enrollment with completion status. We’ll contact you once your account has been created.
Follow the steps below to request new user access:
Read the Emma Acceptable Use Agreement and complete the attestation.
Select this link to launch the Emma Acceptable Use Agreement in Workday. You may need to log in with your WashU Key.
Follow the steps below to download your certificate of completion for completing the Emma Acceptable Use Agreement in Workday.
- Navigate to Workday. You may need to login with your WashU Key.
- From the left-pane menu, select Learning.
- From the Learning screen left-pane menu, select My Learning.
- In the center of the screen, select View Learning Transcript.
- Find the course in your Learning History and select the magnifying glass in the first column.
- Select the PDF icon in the top right corner of the screen. The PDF will be saved to your default downloads folder.
Complete the Emma Access Request form. Select Add Attachment to upload your Emma Acceptable Use Agreement Learning Enrollment with completion status PDF.

Resources for Current Users
Join the WashU Emma Mass Emailing Community on Microsoft Teams to learn about Emma updates/new features/best practices, collaborate with other Emma users across the University, and access resources.
This document covers important topics such as: Emma is not HIPAA compliant, WashU InfoSec Policies, the CAN-SPAM Act, Emma’s Acceptable Use Policy, and Accessibility Requirements.
Some of these topics can result in hefty fines for the university if we do not comply, so it’s imperative to be aware of them.
WashU IT provided training:
Intro to Emma course in Workday: Use the table of contents to jump to the topic of interest or complete the full course and earn your certificate!
Emma Getting Started user guide (PDF)
Vendor provided training:
- Emma Access Request form: Use this form to request new access, or to modify or remove existing access to Emma.
- Emma Sub-account request form: Use this form to request a new subaccount, or to modify or remove an existing subaccount.
- Emma Template Access form: Use this form to request access to MarComm and Medical MarComm templates.
- Emma Segments Request form: Use this form to request distribution list segments from Workday. (Access to segments is limited to subaccounts where there is a defined business need to send operational communications regularly to these populations.)
- If you have other questions or requests, please complete and submit the Get Help Form in ServiceNow.
Note: Many answers can be found in the Intro to Emma course in Workday. You can jump directly to the section of interest using the table of contents. Emma’s resource hub is also a great source of information with a robust search feature.
Note: Custom HTML within campaigns and templates is the responsibility of the author, owner, or sender and is not supported by the WashU IT organization.
Note: Contact the WashU IT Service Desk for urgent matters by calling 314-933-3333.
WashU IT Operational Communications
For information about requesting WashU IT services communications, visit Communicating About Services.
To maintain within our contact limits with Emma, it is imperative that you keep your contact lists clean. Below are instructions for cleanup.
- For No Opt Out subaccounts, please complete both processes #1 and #2.
- For Opt Out subaccounts, please complete only process #1.
1. For all subaccounts:
Follow these procedures to remove contacts who are not engaged with your campaigns:
- Navigate to the Audience screen.
- Select Segments from the left pane menu.
- Select Create a segment.

- Name the segment “Contact Cleanup Group” and enter the following criteria:
- Have not opened > any mailing > in the last > 52 weeks
AND - Email > does not contain > wustl

(To avoid removing recently added contacts, you can add a third line: Contact since > is before > date.)
- Have not opened > any mailing > in the last > 52 weeks
- Then select Save.
- Select Refresh.
- Check to see if the number of contacts who fit this criterion is zero.
- If it is a number greater than zero, select Actions and Archive all.

- Repeat this by opening this segment and following steps 6-8 monthly to keep your contacts up to date.
2. For No Opt Out subaccounts only:
By law, you cannot send campaigns to recipients with email addresses outside of our wustl.edu domain. It violates the CAN-SPAM Act not to offer opt out functionality for recipients outside our domain and can result in fines to the university.
Further, Emma periodically audits our use of these subaccounts and reserves the right to revoke our ability to provide no opt out subaccounts for any user across the university if they find misuse.
To check for and purge outside email addresses within your subaccount,
- Navigate to the Audience screen.
- Select Segments from the left pane menu.
- Select the Non Wustl Email Addresses segment.

- Select Refresh.
- Check to see if the number of contacts who fit this criterion is zero.
- If it is a number greater than zero, select Actions and Archive all.
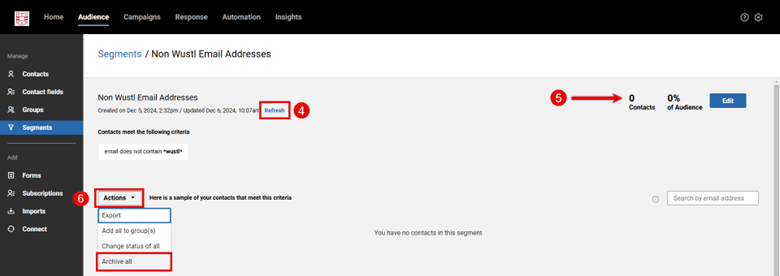
- Repeat these steps monthly to ensure your contacts are cleaned up.
Campaign Editing Quick Guides
- Log in and open the Campaigns section of your account.
- On the Emails page, click the Create new campaign button.
- Select which template you would like, choose from a previously saved template, pick a design from the template gallery, or start from scratch.
- Design or customize the campaign to your liking using the drag and drop editor.
- Always be sure to send a test of your campaign before sending it out to the intended audience.
- When you’ve finished working on the content for your campaign click the Review button to add your recipients, sender and subject line and to send it.
Follow instructions in this article to build a campaign using HTML code.
Note: Custom HTML within campaigns and templates is the responsibility of the author, owner, or sender and is not supported by the WashU IT organization.
Header graphics should be no larger than 700 pixels wide and 200 pixels in height. Graphics within the content should be no larger than 480 pixels wide and 480 pixels in height.
This article provides tips and recommended image specs so that you can choose email-friendly images when creating campaigns in Emma.
Information Security best practices recommend against attaching files directly to an email, which can also cause system delays. To share a file, add a link within the message to the file stored in Box or add a file directly to your Emma campaign.
- Using a Box link: Since Emma is not HIPAA compliant, consider using a Box link with a secure password if necessary. Here are instructions on how to create a shared link in Box.
- Add a file directly to an Emma campaign: Follow these steps.
Note: The file will be stored in and accessed from Emma, much like how files are stored in and accessed from Box. Keep in mind that Emma is not HIPAA compliant.
After approving the test, from the drag & drop editor select Review in the upper-right. This will prompt a proofing check and then open a window with the campaign sending settings.
Select the recipients by clicking the add person icon. You can add one or more groups, segments or subscriptions. You may also check the box to exclude an audience segment.
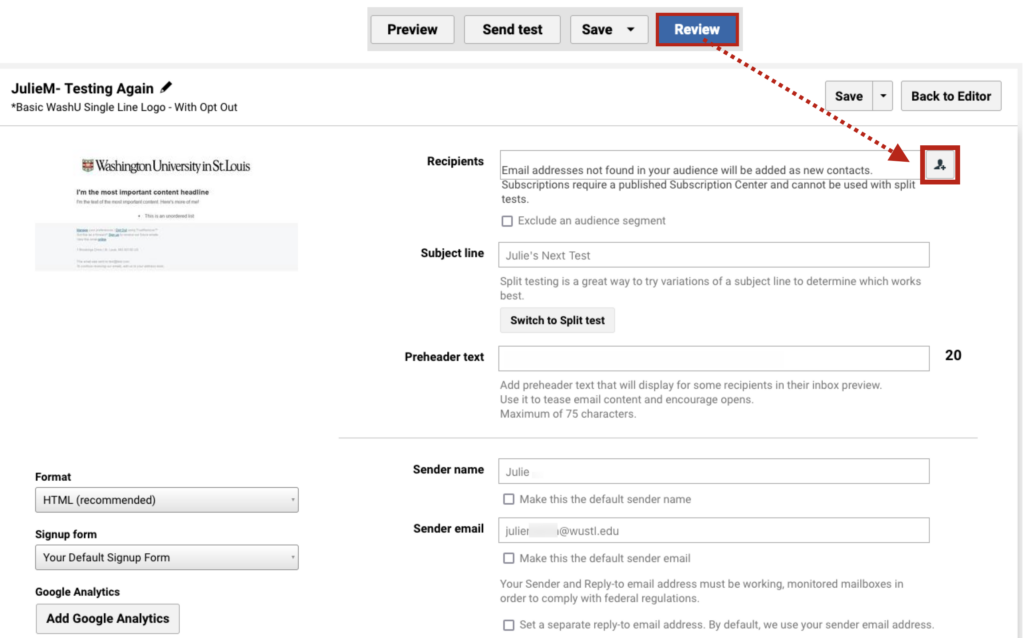
Enter the subject line.
You may decide to switch to a split test, where Emma will test two different subject lines with two small portions of your audience, and then whichever subject line gets the best results, will be used to send to the rest of your audience.
You may add or ignore preheader text.
Verify or edit the sender name and sender email.
If the recipient replies to the message and the reply should go to someone other than the sender check the set a separate reply-to email address and complete the field.
Leave the Format defaulted as HTML.
Select a different signup form if desired.
Do Not add Google Analytics, this is not HIPAA compliant.
Then select Send Now or Schedule for later. If you use ‘schedule for later’, select the date and time you want the campaign to send. If you wish to notify anyone when the campaign sends then enter the email address(es). They will get a copy of the email, along with a notification in top line of the email alerting them that the email has sent or is in the process of sending. Then select Schedule it.
Anchor links are also called bookmarks or jump links because they jump the reader down to an item somewhere else in the same page.
While anchor links can be useful, they are often a sign that a mailing is too long, which may impact deliver-ability and decrease the likelihood of contacts reading the full mailing. As a result, the new editor does not have built-in functionality to create anchor links. Instead of using anchor links, best practice is to put essential information in your campaign and link out to your website or a landing page for full details.
If anchor links are non-negotiable for you, the workaround below will provide the same functionality as an anchor link. Please note: Due to limitations beyond our control, anchor links are not supported in mobile platforms. There are also some email clients that do not support anchor links, so you’ll want to be sure to send a test of your campaign to the different email clients in your audience.
After your content is in place for both the jump-to-content (in your section below) and the text that will hold the link (in your section near the top) follow the steps below to add your anchors.
Step 1: Drag an HTML block to the location that you want to use as the destination for the anchor link (just above the jump-to-content).
Note: The way this functions, clicking on the linked text will take readers to the HTML block, so you could put it above or beside the content you want readers to associate with that anchor. The HTML block will be invisible, so it will appear as if it is anchoring to the desired content. Please note, in order to place the HTML block next to the content, you will need to be working in a row that has multiple columns.
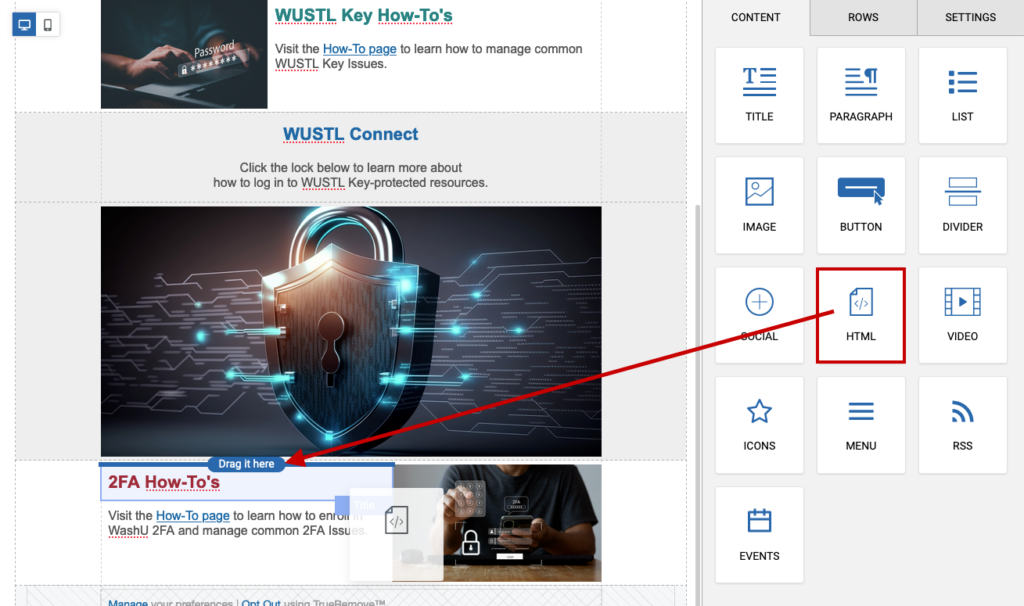
Step 2: With the HTML block selected, in the properties panel, type the following code: <a name=”ANCHOR”></a>. You’ll need to replace ANCHOR with a unique word that you feel is appropriate.
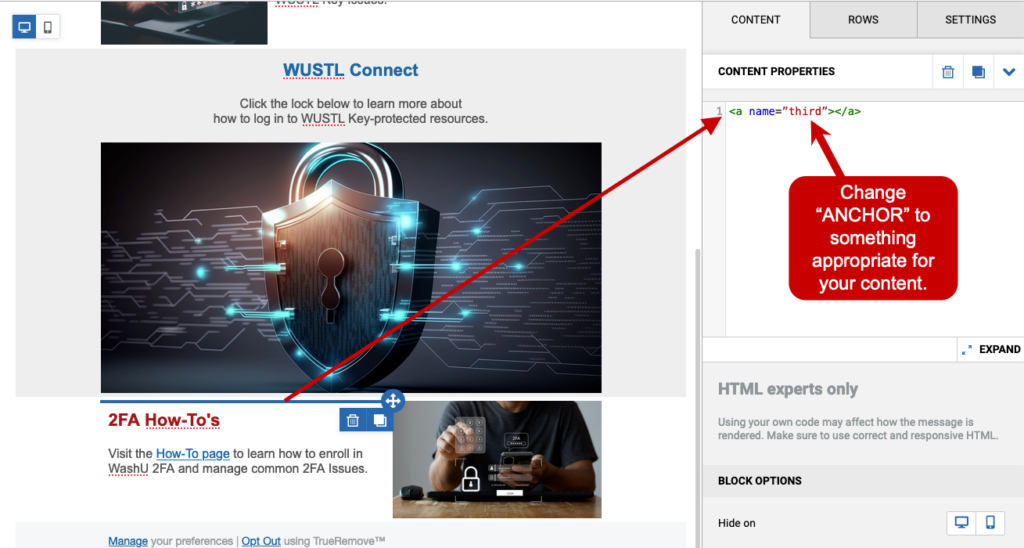
Step 3: In the top section, highlight the text that you will use as the anchor link itself then select the link icon.
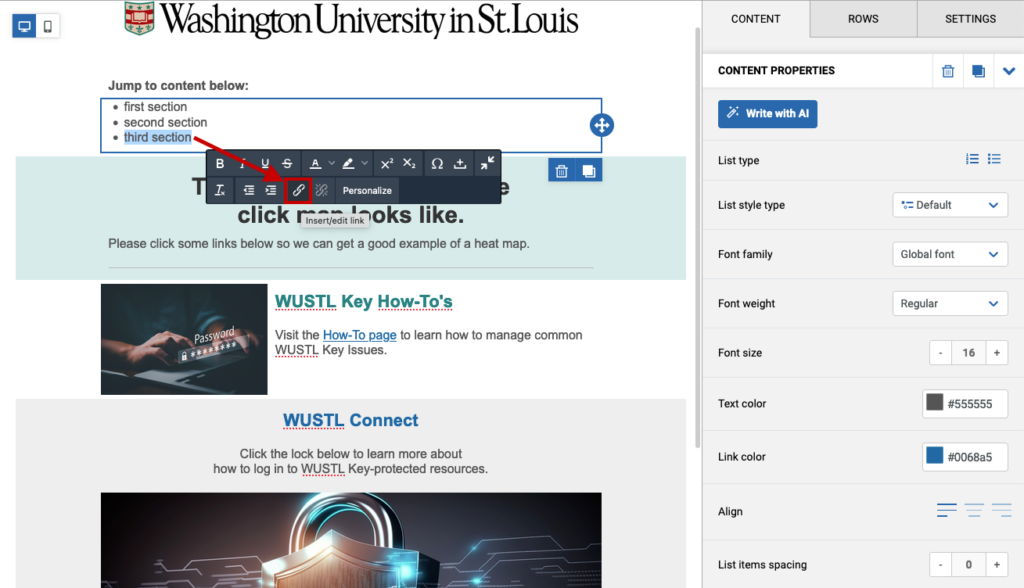
Step 3a: In the URL field type # and your anchor name with no spaces (example: #third) then select OK.
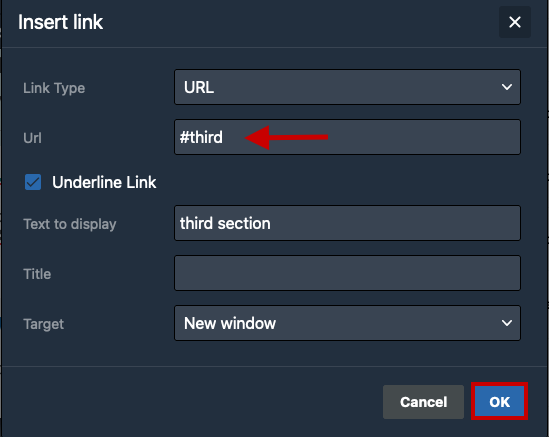
Step 4: Repeat these steps for each anchor needed.
Are hyperlinks that go to anchor links track-able?
No. Anchor links cannot be tracked.
Learn more about hyperlinks.
This article explains how to change the address in the footer of your campaign from your Emma profile account.

Step 1: Log in to Emma.
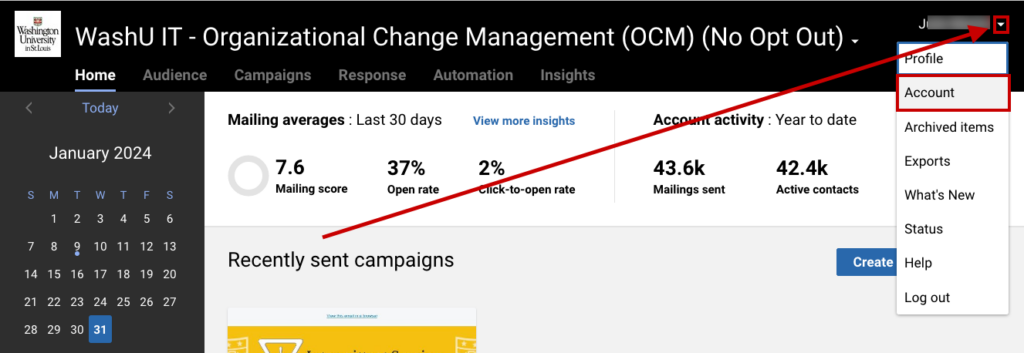
Step 2: From the Homepage select the drop-down arrow next to your profile name.
Step 3: Select Account.
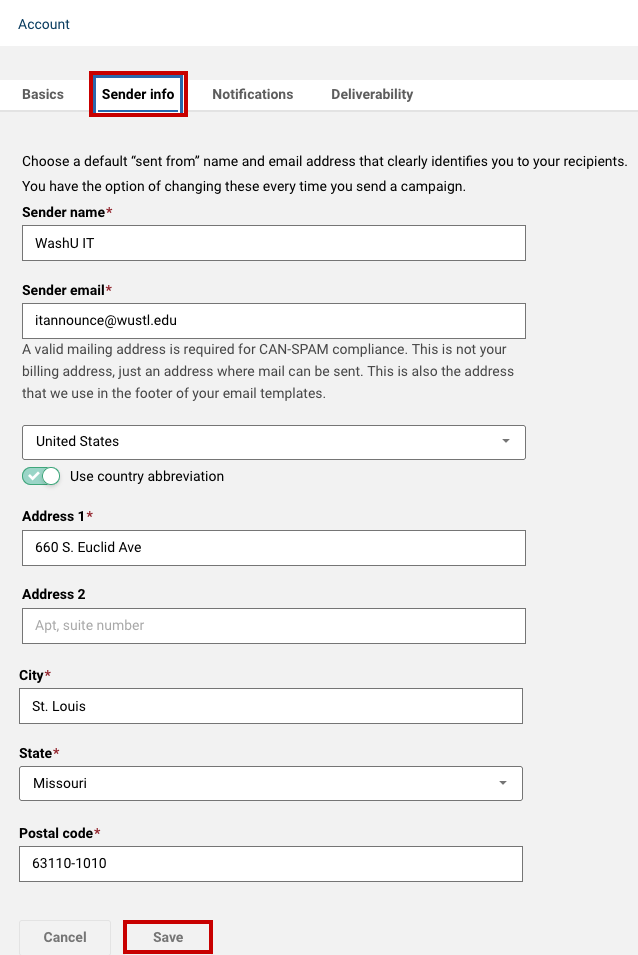
Step 4: On the Account page, select the Sender Info tab.
Step 5: Change the Sub-Account information as needed and then select Save at the bottom.
Other Quick Guides
- Log in and open the Audience page.
- Select Imports from the left-side menu.
- Select the Import contacts button.
- Add your Excel or CSV file by dragging and dropping in the designated area or select Choose file.
- You may leave all other settings as default or change them as needed.
- Select Continue.
- Minimally, set the email fields using the drop-down and uncheck “skip” if the column shows an email address or contact data you wish to import.
- Select Continue.
- Add this list to an existing group or create a new group by entering the group name and selecting Add.
- Select Continue.
- If applicable, add the group to a subscription.
- Select Continue.
- Select Import.
- Your group will then show in the left-side menu Groups section.
This article describes how to produce a list that contains the email addresses in a single column.
The problem is, if a user breaks down a distribution list in Outlook or OWA to the individual members and then copies and pastes into Excel, the email addresses will all appear in the same cell.
Refer to the PDF guide attached to this Knowledge Base Article for steps to take an Outlook distribution group, break it up into the individual members, add it into Excel, and format it as a single column of email addresses. The list can then be used in your mass-emailing software.
This article explains how to open your campaign in a web browser from Emma and then access the HTML code.
Step 1: Log in to Emma.
Step 2: Navigate to the Campaigns page.
Step 3: Select the Sent tab.
Step 4: Locate the campaign. Use the drop-down arrow at the end of the row to select View response.

Step 5: In the upper-right of the Responses page select Open webview in a new window.

Step 6: In the window that opens with the campaign message, right-click anywhere on the message and select View Page Source.
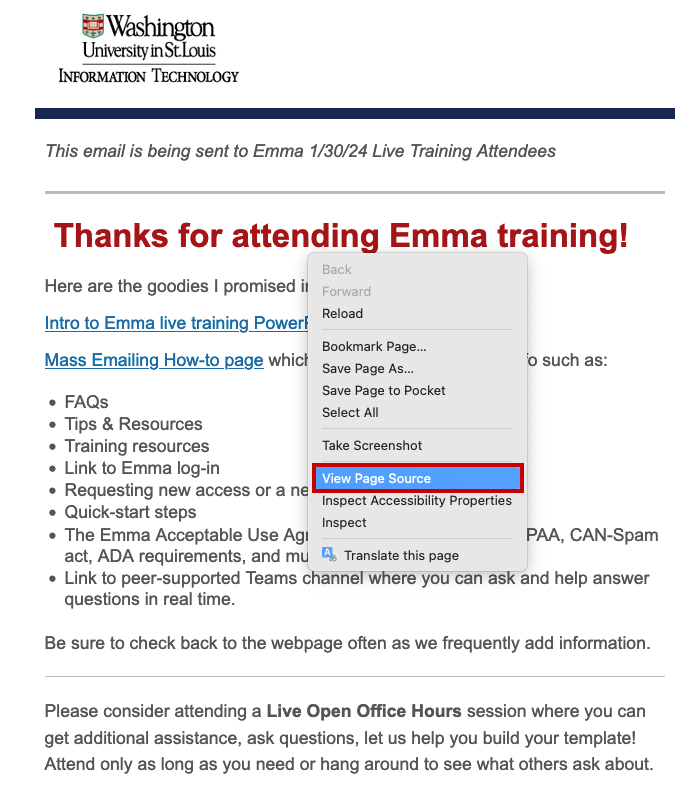
Step 7: The HTML will display. Select All, then copy the code to an external source.
Note: You may need to additionally download any images and replace the links within the code with the images new URL.

From the Campaigns page, select the Images tab, locate the image and select the down-arrow from the far right of the image row then select Download.
Items and email addresses that have been opted-out may be stored in archive for up to 180 days. To restore an item or email address follow these instructions.
Note: Emma will not allow duplicate data. If you try to add data and get a pop-up message alerting of a duplicate or creation error, the data most likely already exists in an archived status.
This article explains how to change the address in the footer of your campaign from your Emma profile account.

Step 1: Log in to Emma.
Step 2: From the Homepage select the drop-down arrow next to your profile name.
Step 3: Select Account.

Step 4: On the Account page, select the Sender Info tab.
Step 5: Change the Sub-Account information as needed and then select Save at the bottom.

Emma’s convenient Eventbrite Audience Connect integration lets you sync your contacts from Eventbrite with your audience groups so you can send to them from your Emma account and track those email’s performance.
This article explains how to connect your Eventbrite account to your Emma account and sync the contacts between them using the Eventbrite Audience Connect.
FAQ
No, but you can change your default profile as needed. How to change your ‘from’ sender details.
To ensure deliverability, only use sender email addresses within the same domain that was used to set up your subaccount (eg., @wustl.edu, @olin.wustl.edu).
What is the difference between Opt-out and No Opt-out?
The Opt-out option provides a method for audience members to opt out of receiving any communications from the sender. It’s often referred to as an ‘opt-out link’ or ‘unsubscribe link’ and it is considered a best practice to always include an opt-out link with any marketing email.
The No Opt-out option does not provide a method for the recipient to opt out of emails from the sender. Our organization, which consists of emails ending in wustl.edu, is exempt from the CAN-SPAM Act. We do not allow for Opt-outs because some communications are necessary for business continuity or for security notifications.
IMPORTANT: It is technically possible to add a non-wustl email address to a No Opt-out audience group in our WUSTL-Emma instance, but this is considered a violation of our contract with Emma. Emma does periodic audits and if we are found in violation, it could impact not only the sub-account that caused the violation, but Emma could remove the No Opt-out option from ALL of our university sub-accounts. So, be sure before uploading a list into a No Opt-out account that it only contains @wustl.edu email addresses.
If you need to send to email addresses that are outside of our domain (@wustl.edu), please request an Opt-out sub-account.
A mailing score shows how your email performed, in terms of opens, clicks and shares, on a 10-point scale.
Compliance & Best Practices
The WashU Brand of Emma is not approved for use with Personal Health Information (PHI) or Personal Identifying Information (PII). The software is strictly limited to purposes that support the mission of the university, including but not limited to academic and research purposes. Large university-wide email campaigns of WashU faculty and/or students require advance approval from the Office of the Provost. Any user who violates this rule will have their account terminated.
If unsure whether or not your email campaign contains or requests sensitive data, contact these departments for guidance;
- HIPAA Privacy Office for Protected Health Information (HIPAA)
- University Registrar for Protected Student Information (FERPA)
- Information Security for Personally Identifiable Information (PII)
- Human Research Protection Office for the use of Emma in human research studies
As a general rule; anytime that your recipient audience is outside of the university domain (email addresses ending in @wustl.edu) then you should offer an opt-out option. There are exceptions to this rule, but unless you know that you are not affected by them it’s best to use caution and apply the rule.
To find out more read about the CAN-SPAM Act.
Google and Yahoo announced that as of February 2024, they will begin to enforce new email authentication standards, setting a new standard for unsubscribe or opt-out links.
- Google and Yahoo will require all senders to authenticate their emails.
- Recipients must be able to unsubscribe from bulk mailings with ease, and senders must process and honor those unsubscribe requests within two days.
- Google has promised to establish a clear spam threshold of 0.3% in order to maintain access to Google inboxes.
- University Marketing & Communications
- MarComm’s home page
- Marketing & Communications: Our Voice
- Information about our messaging tone and values
- Writing Style Guide
- Marketing & Communication Resources
- Contains links to resources such as logos, licensing and branding, requesting help to produce communications and more!
It’s a best practice to add your username as an identifier within the campaign title.
Because there are no folders to organize your campaigns within your sub-account and everyone within your sub-account is also saving their campaigns to the same page, the list could get very long and cumbersome to locate a particular campaign.
Adding your username to the campaign title makes it easy to narrow down your search by entering your username in the search bar near the top of the campaigns page. The page will then return all campaigns with your username in the title.
Additionally, when it comes time to clean up the page and archive old or unused campaigns, it will be easy to know who to ask about archiving the campaign in question.
To further narrow down your search experience, it’s also recommended that each sub-account adopt an organized naming scheme that includes the expected send date, a brief description of the campaign and your username. You can then search for any of the naming scheme keywords.
- Format: Send Date (YYYYMMDD), Brief Description, Username
- Example: 20240219, Emma Group 3 Notification, mgerst